Today would be one of those days we would be camped out inside the rig, it looks like the PNW has arrived in southern Indiana today....dark, light constant rain. The coffee is hot, the hounds are back to sleep wrapped up in sleeping bags and a full schedule of college football is planned.
I feel myself slowly migrating to my own winterizing, by hibernating in the house preparing for a winter that is a month to two months away. Another words nothing is going on to blog about, besides a normal daily life. It's the job during the week, a daily dog walk in the afternoon, some reading at night, time on the internet and then to bed with the windows open in mid 40's temps.
This time of year I find perfect in Indiana. The days are sunny, clear and temps in the mid 70's. Can't feel the humidity if there is any. The leaves are turning colors slowly but this year they are a dull color, nothing vibrant, that makes people drive a lot of miles to observe the bright colors.
Last weekend was out of the ordinary for my schedule as I was helping a friend out that had a family emergency. Still besides the rig repair a few weekends ago I find myself having just enough time to finish the odds and ends around the house. It's those typical weekends when you have a job during the week and are a homeowner. There is always something that has to be done, like errands, recycling runs, dog vet trips, yard work, and maybe some preventive maintenance on the house.
The camping urge has seemed to disappeared. Is it time to winterize the rig?
After backing out of buying the Lil Snoozy trailer in September, I mentioned I had no plans to buy a trailer or any rig until I was getting ready to leave in the spring of 2014. I said and thought that because why would I buy a rig in the fall and then have to park it all winter for lack of use? I can only justify my earlier than planned purchase with a few reasons. The rig condition was the best I had seen in the used rigs I had looked at over the past couple of years. It had everything I needed, plenty of room for the hounds and I. It was local (not planned) so that saved me a lot of money in gas driving it home or shipping charges if I were to have bought it out of state. I was able to look through the rig before purchase and make a decision instead of traveling many miles to see it in person.
Those are some of the reasons that keep me from second guessing an earlier than planned purchase.
I must admit, at times I do wonder if I made the right decision in making the purchase earlier than I had planned. At times I feel like selling it. Then I sit inside the rig and think about my plans for the spring of 2014. I have re-inspected every nook and corner inside and out. It always feels good spending time in the rig. The hounds love being inside it, each of them have their own spots now. It feels good when I picture the rig moving down the back highways heading west. When I think of the places I am going to go, pictures of places of the people I follow on the sidebar and some old places I have been to in previous travels ... It's during the times I spend inside the rig that I know I have made the right decision in making a purchase earlier than I had planned.
The rig is in great shape. More than enough storage for just one person, plenty of room for two or three 40# bags of dog food, good size tanks, a TempurPedic mattress to sleep on and enough windows to enjoy the scenery when having to camp inside like we would be doing today.
Even with conflicting urges of hibernation like usual this time of year in the midwest and a slight urge of "hitch itch" .... all is good. Patience is required right now and that's always a hard thing for me. Next spring can't get here soon enough.
It's great to see all of the movement from the travelers I follow, each going somewhere different based on their needs/urges. I just need to get out there and join them because I would feel a lot better.
Have a great weekend.
October 19, 2013
October 13, 2013
Coach Battery Switch & Thoughts
Answers to my questions came fast today as I checked the charge to my coach battery. The battery was fully charged. I changed the path of the extension cord that runs from my house outlet to the rig electrical power cable. Before I had it running out my door while home and would unhook power during the times I was at work or away from the house. With the fridge running all the time, thinking that would switch automatically to gas when the power was unhooked, could that have been the culprit to running down the charge of the house battery? So yesterday afternoon I moved the extension cord to the back of the house to the rig power cable, where I can leave it plugged in all the time.
This morning I unplugged my house electric from the rig, went inside the rig and checked what would or wouldn't turn on using the coach battery. Everything came on using the coach battery including the generator, which started right up.
So I am not sure what the draw was to run down my coach battery but with the overnight charge, it's up to speed, fully charged. Maybe it was the broken pin on the 15A-30A adapter that I found last week and replaced or the time I unplugged it while I was away from the house.
I did not find any interior battery switch to turn the coach battery on or off. What I believe the seller called the switch is the green knob pictured below. The pictures below are what the seller showed me when he described of turning off the coach battery.

 |
| Switch Turned On |
 |
| Switch Turned Off |
The knob was tightly screwed down to the "on" position. So I am thinking there was something drawing against that battery while I had the house power unplugged during the 9-10 hours per day I was at work. Today I shut off the fridge, leaving the doors open and will only turn that back on a day before I hit the road for any weekend trips this fall and winter. I also have the tv unplugged while I am parked.
The more I look at the rig, the more I like it and realize I have plenty of storage even if I were to full-time travel. Also the hounds love it, if the coach door is open, all three run inside without saying a word. The overhead bed will be used as more storage with a possibility of mounting my 46" tv from home in that area and strapped down during travel....that is way down the road though if that happens.
The oil level in the generator looks good, propane tank is 1/2 full, the Chevy fuel tank is 1/2 full and the convection stove/microwave combo, the 3 spot range all look like they have never been used.
After a lot of thinking recently, I believe I have downsized about as far as I want to go. A few weeks ago I posted that I was moving everything into the rig as if I were leaving and selling or getting rid of everything left in the house.....but I haven't had the urge to get rid of the things left in the house which there isn't much left. Yes, for someone single, some might think I have too many vehicles (my weakness) but they each have a purpose, low mileage, fairly cheap to license and insure them. So until I decide differently I am going to keep all the vehicles I have whether if I am on the road or not. They are pictured on "The Toys" page, linked at the top of the blog.
The house? Many readers will remember I went back and forth on selling or keeping it all summer. In fact co-workers that drive by my house to and from work said they could not keep up with the number of times I took the "for sale by owner" sign down, then would put it up. LOL I haven't thought much about it lately, so that tells me this paid off small home will stay as my base camp, one that is about 1,500 - 2,000 miles from where I will be traveling. At least if I am sitting out west somewhere and become am tired of traveling I have a place I can return to.
I don't think I will be leaving before November 2013 like I would like. Financially it's best if I leave as I planned in October 2011....leave in April/May 2014. By leaving at that time my first year traveling may be a full year simply because I do not want to come back and live in the winter's cold, snowy and icy weather in Indiana. So I might return home in the spring of 2015. That year would give me a pretty good idea if I want to be a part timer or a full time traveler. After that, I'd leave October/November time frame for warmer temps and return in April....unless I want to eliminate the humidity, then westward I would go.
After the past couple weeks that were a little frustrating I think things will calm down a little now that I know more how this "thing" operates, plus the plans seems to be falling into place.
October 12, 2013
Learning More About the Rig
Today is a pretty lazy Saturday. I had plans to meet and camp on a fellow blog reader's land this weekend but I had to cancel Friday morning due to helping a friend with some emergency help this weekend. His news proved again, you never know what is around the corner in the game of life.
The rig looked ready for the short road trip to his property, so hopefully it can happen a different weekend before it gets colder in the Midwest.
Since the oil line repair, it's been very quiet, not much to write about as life moves on at a normal pace. I did have something new happen on the RV this week that may just be my mistake until I learn otherwise.
I have been running power from my house into the RV only when home because that extension cord runs from inside my house to the RV. While gone I need to shut and lock the door. I just had a different idea on how to run that cord, so changes may be today so I can have the rig constantly hooked up to power.
What I found is, when the rig is not hooked up to power, then I have no power inside the rig. The coach battery is dead. When I start the rig, she fires right up without hesitation. I thought while hooked up to power, there was a "trickle" charge to the coach battery. The previous owner had installed a quick disconnect on the coach battery but I can't remember that he told me I needed to do anything with that if I was parked and hooked up.
Once I am hooked up, everything works fine.
With the lack of battery power, I thought the fridge would automatically move to propane but that doesn't seem to be the case. Without hooks ups, there is no power to the fridge, no lights and no longer cool/cold inside the fridge.
While chasing possible electrical problem for the coach battery going dead I did find the 15A -30A adapter had a broken pin so I picked up a new one at the local hardware store that has a new RV section of popular brand names of RV accessories.
Even after a night of the new adapter and electrical power hook up, once I unplugged, there was no power inside the rig.
I'll look at it again Sunday morning .... but for the rest of the day and night tonight is my addiction...College Football.
Have a great weekend!!
October 08, 2013
Oil Cooler Lines Tested - No Leaks
Came home from work with clear sunny skies and 70 degree temps, it was time to finish the job.
The first clip, top of radiator was a little hard to put on at first but after I used my angled mirror to see the bottom of the connector and then a pair of needle nose pliers to pull the clip around the connector, things went pretty quick. It took a total of 20 minutes for the 4 clips but most of that time was on the first clip and the upper connector at the oil filter block underneath the rig.
I wiped everything down so there was no oil from the past, turned the engine on and then looked at all the different connectors, with my small bright LED flashlight....not a drip of oil anywhere. I increased the engine idle speed for a minute or so, then little it idle for about 10 minutes while I went inside to clean up.
After rechecking all of the connectors for leaks, I took it out for a short 12 mile run on the highway at 55mph.
No leaks.
Total cost was around $100 counting the lines and the hook tools I bought. I'm pretty sure I saved myself around $150-$200 in labor if I had a mechanic do the work. I gained a lot of experience and learned more about the rig I bought.
I plan on changing the oil tomorrow just so I can start with clean oil and will know the date, mileage and type of oil without any guess work.
October 07, 2013
Day 3 - Oil Cooler Line Clips
I wasn't sure the clips I took off the connectors could be reused even if they were not stretched out. So I thought I'd buy new ones. I ended up buying 3 of them at NAPA but they didn't have a 4th in the same size.
Before I stopped at NAPA I stopped by my local GM mechanic where I had bought the OEM oil cooler lines. I showed him the clips I had pulled out and asked him if I could use them again. Bill said I could as long as I didn't stretch them out when I pulled them out. Then he said something quite interesting that made me wonder what was going on.
Bill said the only way I could buy new clips was to buy the new connectors. I asked him before buying the oil cooler lines if I needed to buy new connectors or could I just buy the lines and he said only the lines were needed unless my leaks were at the connectors. Today after I started to leave, he said he would recommend I buy new connectors with the new lines. I asked him why didn't he tell me that when I bought the lines because he knew what I was replacing. Makes me curious on why the change of information.
The NAPA owner said I would have no problem using old connectors with new lines. He explained the clips would work on the old connectors and the black plastic sleeve that slides over the clips not only protests the clip from dirt but is also functional in keeping the clip lined up as the sleeve snaps into the connector.
Hopefully tomorrow I'll get the clips installed after work. Then I'll fire the engine up for a quick to check for any leaks.
Looking at the old clips compared to the new clips there was a difference in spacing, so they had possibly stretched a little but I could squeeze them back a little with pliers to their original position.
October 06, 2013
Day 2 - Oil Cooler Lines Installed
Only 4 new clips to go.
I told you before I wasn't a mechanic but I have been able in the past to do the basic repair for trucks, VW buses and cars. So I kept thinking last night, this job cannot be that hard to do. It's 2 lines and 4 connectors with a clamp clip that is extremely tight to get under to pull out. Add my confusion with what my mechanic Bill told me last week. I was under the impression talking to him, the clips stayed on and "his" tool just turned them enough releasing their pressure to pull the oil lines out.
That was a wrong impression.
So I took off to the local AutoZone to return the "oil cooler line" tools back for a refund and hopefully talk to someone different over there that may know something or anything about what I am trying to do. After all, I have shown everyone at NAPA and AutoZone the pictures I posted on this blog and had in my iPhone. NO ONE told me to pull the clips out....they kept selling me a set of "oil cooler line disconnect tools" that would spread those clips, release the pressure and slide the old lines out and the new lines in. Only the YouTube video talked of pulling the clips out. Now that I know what the clip's purpose was with this type of oil line, it's simple why you pull the clips out.
I left AutoZone with my 3rd set of "the right set of oil cooler line installation" tools, a Haynes Manual for Chevy Vans from 1998-2010, for my own sanity. Since my rig is on a Chevy Van Express 3500 frame.....and it included pictures I felt this manual might be worth the overpriced cost. I'm good with pictures....LOL. Still I wasn't sure the pictures I needed would be in the manual. I got home just in time for the Indianapolis Colts football game on TV so I had pretty well decided that I was done with auto repair for the day, just by making my purchase. During the first commercial I started looking the the Haynes Manual and I find a picture that could have been taken from my iPhone of the infamous clip that I couldn't get off. The describe the process of TAKING OFF THE CLIP!!
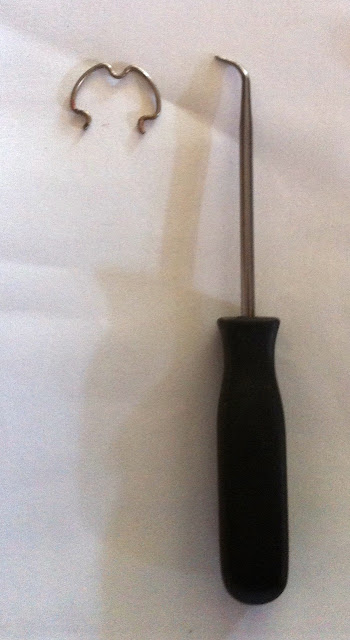
While the Colts fell behind 10-0 fast, I set the DirecTv DVR to record the game. I picked up my "hook" tool that I thought wouldn't work, only a different angle and got that 1st clip off that was on factory tight in a matter of a few minutes.
I was in shock!!!! That clip had been my hold up on this job ALL weekend!!
I moved to the 2nd clip at the bottom of the radiator and that clip lifted up and out smooth has butter. Now the two metal hoses were not moving. About the time I was going back to football and say heck with it...I tried moving, twisting the top hose and little my little it started getting lose. I took a flat edge screw driver and by twisting that flat edge against the metal line....it popped out of the connector. I'm on a roll so I forget about football, I'm going to finish this job today.

The lower metal tube on the radiator, came out with no problem. Now I had to get a one bolt bracket off that held both hoses in place before it went underneath. The problem was I couldn't fit my arm down there at an angle where I could get a socket wrench on it. In the picture below, that bolt is in the black spot in the center. I finally got that off, pulled the bracket up to along the hoses and took it off.

The big U bracket that the two lines run through is shown below.

I got underneath the rig to pull the lines toward me but even with the black rubber material I couldn't get them to flex and move around some of the RV frame....so I cut both rubber hoses and let the oil drip/run into my oil pan I use for oil changes. I am about half way of getting these lines out, when I run onto a different one bolt bracket that later was a lifesaver when I re-installed the new lines...this bracket not only supported the lines but lined them up correctly. It was pretty easy to get to even with little room under the rig.

Two clips to go up by the filter...I use the hook tool...1st clip out within seconds. The last one of four clips turned as I pulled one end out and I thought I had lost it on the ground (grass) under the RV but there was so little room to maneuver that I couldn't just turn to see where it may have landed. I couldn't find it. The 3rd line comes out smooth as butter. I get to the last line and it will not budge...will not twist..nothing...it's like it's frozen in that connector. I'm stuck on the final line!
I go in the house to get my LED small flashlight. As I look at the final line, I see that clip had not dropped into the grass but had swung around to the back of the connector. The clip was attached enough that it was still holding the line inside the connector.
So all the lines are out, my hands are covered in black oil residue, road dirt, underneath grease gunk and everything else that comes with working on a vehicle. I was able to keep all of my fingers, wasn't missing any tools nor the two bolts I would need to put the brackets back in. I didn't have any oil drip into my eye but my old ballcap took some major oil drips as I was under the rig working.
I did this work while keeping Winston (oldest basset) away and telling him to get out from under the rig...he was determined that I needed help under the rig, so he had crawled on his stomach to get a hounds eye view of the work underneath the RV. Luckily he lost interest and scooted out backwards and laid in the sun the rest of the afternoon.
I almost decided to stop there and install the new lines on Monday but I thought there's plenty of daylight left, it's sunny .... so I thought I'd at least get the lines pulled through the frame underneath and attach those two brackets that lined up the lines but not tighten them until I had all four lines in their connectors.
The longest part of the installation was installing these two 1 bolt brackets. Some of the time I couldn't see what I was doing. I needed to squeeze this U shaped bracket at the bottom, slide the bolt in and then find the hole on the frame that the bolt was to attach to. It took me a while but finally got the bracket bottom squeezed together with my index finger and thumb while holding the bolt with my middle finger. Once I felt that bolt fall in the bracket...I slid it over about 1/4" by feel, couldn't see anything, I feel the bolt hit the hole in the frame. It's screwed in one click at a time on my socket wrench due to space available.
As I was underneath the RV to put the last bracket in, I couldn't remember how the lines went. I must have spent 30 minutes seeing those lines were not going to work on the bracket the way I had them. They would have been pressed tight against the frame and I knew that road vibration would rub those metal lines into leaking. So I knew I didn't have something lined up right.
I then realized I was trying to put the bracket on the wrong side. Once I moved the bracket to the correct side, the lines lined up perfectly. When I installed each line into the connectors I could hear them pop into place, so a solid seal even without the clips. That oil you see is from the old lines coming out....I didn't wipe it clean before the picture, so the new lines are NOT leaking at this point.

I'm not finished. I have 4 used clips but didn't install them because I am not sure if they are to be reused. I would feel better installing brand new clips and I can get them on Monday. I am going to put in just enough oil to cover the amount that I lost in this repair so I can turn the engine over and check for leaks on the new lines using old oil.
IF....IF there are no leaks after running the engine...then I am changing the oil on Tuesday and will start with new oil. The label in the engine bay showing the mileage, date and type of oil doesn't match the seller's story even though it is a recent oil change...imagine that?....I'll put in new oil and start clean.
So I didn't hit my hour prediction after getting those clips off but I estimate it didn't take me longer than 2-1/2 - 3 hours for the work I did on Sunday. My yard work ballcap took heavy oil drip hits. Better the hat than my head. At least the cap will clean up.

I'm hoping for no leaks with the new hoses installed. If there are leaks, personal counseling will be the next step because I will probably go off the deep end if that happens.
I was sold this "oil cooler line disconnect tool" three different times, different sizes and they never worked as the process was described to me. I know I followed their instructions but I don't think these are for the type of connectors I have. This set of four are going back tomorrow for a $20 refund. The one pictured was the one that would work on my oil lines. Wrong answer.
I told you before I wasn't a mechanic but I have been able in the past to do the basic repair for trucks, VW buses and cars. So I kept thinking last night, this job cannot be that hard to do. It's 2 lines and 4 connectors with a clamp clip that is extremely tight to get under to pull out. Add my confusion with what my mechanic Bill told me last week. I was under the impression talking to him, the clips stayed on and "his" tool just turned them enough releasing their pressure to pull the oil lines out.
That was a wrong impression.
So I took off to the local AutoZone to return the "oil cooler line" tools back for a refund and hopefully talk to someone different over there that may know something or anything about what I am trying to do. After all, I have shown everyone at NAPA and AutoZone the pictures I posted on this blog and had in my iPhone. NO ONE told me to pull the clips out....they kept selling me a set of "oil cooler line disconnect tools" that would spread those clips, release the pressure and slide the old lines out and the new lines in. Only the YouTube video talked of pulling the clips out. Now that I know what the clip's purpose was with this type of oil line, it's simple why you pull the clips out.
I left AutoZone with my 3rd set of "the right set of oil cooler line installation" tools, a Haynes Manual for Chevy Vans from 1998-2010, for my own sanity. Since my rig is on a Chevy Van Express 3500 frame.....and it included pictures I felt this manual might be worth the overpriced cost. I'm good with pictures....LOL. Still I wasn't sure the pictures I needed would be in the manual. I got home just in time for the Indianapolis Colts football game on TV so I had pretty well decided that I was done with auto repair for the day, just by making my purchase. During the first commercial I started looking the the Haynes Manual and I find a picture that could have been taken from my iPhone of the infamous clip that I couldn't get off. The describe the process of TAKING OFF THE CLIP!!
While the Colts fell behind 10-0 fast, I set the DirecTv DVR to record the game. I picked up my "hook" tool that I thought wouldn't work, only a different angle and got that 1st clip off that was on factory tight in a matter of a few minutes.

I was in shock!!!! That clip had been my hold up on this job ALL weekend!!
I moved to the 2nd clip at the bottom of the radiator and that clip lifted up and out smooth has butter. Now the two metal hoses were not moving. About the time I was going back to football and say heck with it...I tried moving, twisting the top hose and little my little it started getting lose. I took a flat edge screw driver and by twisting that flat edge against the metal line....it popped out of the connector. I'm on a roll so I forget about football, I'm going to finish this job today.


The big U bracket that the two lines run through is shown below.

I got underneath the rig to pull the lines toward me but even with the black rubber material I couldn't get them to flex and move around some of the RV frame....so I cut both rubber hoses and let the oil drip/run into my oil pan I use for oil changes. I am about half way of getting these lines out, when I run onto a different one bolt bracket that later was a lifesaver when I re-installed the new lines...this bracket not only supported the lines but lined them up correctly. It was pretty easy to get to even with little room under the rig.

Two clips to go up by the filter...I use the hook tool...1st clip out within seconds. The last one of four clips turned as I pulled one end out and I thought I had lost it on the ground (grass) under the RV but there was so little room to maneuver that I couldn't just turn to see where it may have landed. I couldn't find it. The 3rd line comes out smooth as butter. I get to the last line and it will not budge...will not twist..nothing...it's like it's frozen in that connector. I'm stuck on the final line!
I go in the house to get my LED small flashlight. As I look at the final line, I see that clip had not dropped into the grass but had swung around to the back of the connector. The clip was attached enough that it was still holding the line inside the connector.
So all the lines are out, my hands are covered in black oil residue, road dirt, underneath grease gunk and everything else that comes with working on a vehicle. I was able to keep all of my fingers, wasn't missing any tools nor the two bolts I would need to put the brackets back in. I didn't have any oil drip into my eye but my old ballcap took some major oil drips as I was under the rig working.
I did this work while keeping Winston (oldest basset) away and telling him to get out from under the rig...he was determined that I needed help under the rig, so he had crawled on his stomach to get a hounds eye view of the work underneath the RV. Luckily he lost interest and scooted out backwards and laid in the sun the rest of the afternoon.
I almost decided to stop there and install the new lines on Monday but I thought there's plenty of daylight left, it's sunny .... so I thought I'd at least get the lines pulled through the frame underneath and attach those two brackets that lined up the lines but not tighten them until I had all four lines in their connectors.
The longest part of the installation was installing these two 1 bolt brackets. Some of the time I couldn't see what I was doing. I needed to squeeze this U shaped bracket at the bottom, slide the bolt in and then find the hole on the frame that the bolt was to attach to. It took me a while but finally got the bracket bottom squeezed together with my index finger and thumb while holding the bolt with my middle finger. Once I felt that bolt fall in the bracket...I slid it over about 1/4" by feel, couldn't see anything, I feel the bolt hit the hole in the frame. It's screwed in one click at a time on my socket wrench due to space available.
 |
| Bolt in the Center Right of the Hose |
 |
| Underneath Tight Space |
I then realized I was trying to put the bracket on the wrong side. Once I moved the bracket to the correct side, the lines lined up perfectly. When I installed each line into the connectors I could hear them pop into place, so a solid seal even without the clips. That oil you see is from the old lines coming out....I didn't wipe it clean before the picture, so the new lines are NOT leaking at this point.

I'm not finished. I have 4 used clips but didn't install them because I am not sure if they are to be reused. I would feel better installing brand new clips and I can get them on Monday. I am going to put in just enough oil to cover the amount that I lost in this repair so I can turn the engine over and check for leaks on the new lines using old oil.
IF....IF there are no leaks after running the engine...then I am changing the oil on Tuesday and will start with new oil. The label in the engine bay showing the mileage, date and type of oil doesn't match the seller's story even though it is a recent oil change...imagine that?....I'll put in new oil and start clean.
So I didn't hit my hour prediction after getting those clips off but I estimate it didn't take me longer than 2-1/2 - 3 hours for the work I did on Sunday. My yard work ballcap took heavy oil drip hits. Better the hat than my head. At least the cap will clean up.

I'm hoping for no leaks with the new hoses installed. If there are leaks, personal counseling will be the next step because I will probably go off the deep end if that happens.
I was sold this "oil cooler line disconnect tool" three different times, different sizes and they never worked as the process was described to me. I know I followed their instructions but I don't think these are for the type of connectors I have. This set of four are going back tomorrow for a $20 refund. The one pictured was the one that would work on my oil lines. Wrong answer.
 |
| Nothing More Than An Engineer's Dream |
Day 1 - Oil Cooler Line Replacement +1
You may be wondering what the "+1" is about in the title...welllllll let's see if I can keep a smile on my face as I write about it. We had "severe" thunderstorms around 6pm last night. With the torrential downpour I thought that would be a good test for my roof vents that I had left open by mistake. All the vents were open, even the Fantastic fan vent.
Rain was going sideways and hard during the thunderstorm.
Once the rain decreased to just a light rain, Sadie the bloodhound wanted out and Winston the old basset wanted out as long as he could stay under the house overhang...so I thought it would be great time to see if I had any interior rain damage in the RV.
All the walls, ceiling, the over cab bed looked good and dry and I'm thinking it's pretty amazing that all these vents could be open and the vent covers kept the torrential downpour out .... I was impressed to say the least. Just to make sure I wasn't pressing my luck, I closed the vent above the bed to protect any accidents to the new TempurPedic mattress the RV came with.
As I was standing in front of the fridge about to plug in the LED lights, I felt a big drop of water hit my head.
That's never a good thing, especially when you are inside. I glanced up for the source of the big drop of water and I saw a little water residue in the cracks of my light lens. I pulled the lens off and luckily an ocean of water didn't hit my face, I thought that has to be a good sign. Drops have to be better than a waterfall.
So I collect the hounds and head for the house to get a couple of tools so I can take the light fixture out of the ceiling to check on the leak situation. About the time I hit the coach door to walk in the RV, the rain clouds opened up once again for another 30 minutes of downpour. Back inside to watch the next football game. (Yes, I am a college football addict)
While watching football I remember that light fixture is right in back of the A/C. I wondered if that might have something to do with it.
Now forward to the update of the oil cooler line replacement.
Not a lot of success to report on day one. Between the end of my IU game (upset Penn State) and the start of the 8pm game I had enough time to crawl through the local traffic that was in town for the annual Apple Fall Festival. And a crawl it was, but it is the only way I can get to AutoZone 15 miles away. I had called earlier and AutoZone told me they had the right tools to remove the clamp that I pictured in yesterday's post. So off I went to make the purchase.
The set of 4 "hook" tools, small screw drivers with a sharp "ice pic" at 4 different angles, that I had bought at NAPA Saturday morning didn't work. This clamp is on as designed....very very tight. I couldn't get the hook under the clamp to pull it loose. Was my mechanic Bill showing me a tool that would REMOVE the clamp or just LOOSEN it enough to slide out the oil line? I was under the impression from him, it would turn the clamp enough to open up the space for the oil line to be slid out and the new one slide in. All the YouTube video's I have seen, show the clamp being removed and replaced but like I said yesterday ... I didn't have new clamps that came with my oil lines.
So it's early Sunday morning ... coffee is a lifesaver ... and it's cool and rainy outside, it has rained for the past 1.5 hours I have been up and through most of the night.
I'll be heading over this morning to AutoZone to return the tools they sold me. They might be too big but they are designed to fit over the line, push into the connector and since they are spring loaded, they are suppose to open up that tight clamp enough to slide the old line out and the new line in. Based on the tension of the spring loaded tool and the tightness of the clamp on the connector ... I believe their tool was nothing more than a designer's dream.
So the plan for today, return the tool, maybe talk to a different sales person and find the correct tool. My mechanic Bill is closed on weekends and probably only answers calls where his tow truck is required since he didn't return my phone message about borrowing the tool he showed me. One thing though, the connector he showed me last week is not the same type of connector I am working with.
I am thinking I may need a stronger "ice pic" than the one's I have. The search continues for the correct tool. I believe once I find the correct tool to get those clamps (4) off, then I will have these lines replaced within 2 hours tops.
Subscribe to:
Posts (Atom)