Showing posts with label Oil Cooler Lines. Show all posts

February 26, 2016

A Late Morning Hound Walk

The streak of good weather here in 'the tropics' is off to a great start. As we stepped outside for the first time today, the skies were blue, scattered white puffy clouds and the hounds had their noses were to the ground immediately.

Like I predicted yesterday nothing happened the rest of the day. The highlight of the cold afternoon was a trip to the China House downtown for their $7 all you can eat buffet. It's so good that I could almost eat there on a daily basis. Of course whatever is in the ingredients led to a late afternoon siesta.

Stella just stopped by the desk to let me know it was about time for lunch.

I let the bloodhounds roam the field this morning. It was time to load my one load of 1 39gl bag of trash and the one trash container for recycling. Our county recycling program has a deal where nothing has to be sorted so it makes it pretty easy to recycle. No sorting? You cannot get easier than that. For a $2 fee they will also take my 39gl bag of trash.


The bedroom was 'childproofed' for Stella. I decided today that Heidi would come with me. A little bonding between her and I without the bloodhounds trying to get all of the attention. Plus to let her see that every trip in the FJ does not mean a trip to the vet. The trip was successful and she was pretty happy has we drove up the driveway when we got home.

It was so nice around 10:30am, it was time for a walk. Sadie and Stella sensed that we were going and of course that brings excitement with Stella howling and Sadie bouncing up and down with her front paws off the ground. A LOT of photos today.

The other day I looked through my collection of baseball caps to possibly find a replacement for the cap Stella chewed up last week. I thought I had thrown this cap away in 2013 but found it among all of the MLB baseball caps I had bought on my 2 week baseball vacation I took in 2003. One of the best trips I had ever taken, 14 cities, 13 MLB games and one day at the MLB Hall of Fame in Cooperstown. So I pulled out the following "ex" yard ball cap that I thought I had retired.


The green paint on the bill is from painting the house in 2010 and the destruction of material happened when I was changing oil lines on the 2003 Coachman Class C rv in October 2013. It worked out well today during the walk so it will be the "new" yard work cap this summer.

Stella took off immediately on the walk and then turned to wait on Sadie and I as Sadie was doing her normal dragging me to start the walk. I could tell by the way they started, their speed, they would be ahead of me most of the time. Stella stopped on her own to see where Sadie and I were.


They took off around the right corner and never stopped. By the time I got to the corner they were way ahead ... plus they were both looking into that gulley. I yelled "hey" and they both came back out into the field so I could see them. Both of them were coming when called today. Stella might have strayed off like she normally does but came when called every time.


I yelled "hey" and them came back out to the field together
Right after that they took off for the two spots they always stop at. One doesn't want the other to get it all.


As they sniffed that line of bushes I tried to get ahead of them and prepare the camera to take some photos of them running toward me. The only problem was, the camera was ready but as I turned they had sprinted to catch up and were standing right behind me. One of those situations where one bloodhound didn't want the other getting the attention.


I really think Stella likes to get way behind so she can run to catch up with us. Basically most of the places she stops are the same day after day.


Sadie waiting for Stella to catch up


The sunshine made it feel warmer than it was. As it was a nippy 38° during this walk but felt much warmer. After telling the hounds "lets go home" they both came together on the path and headed home. At the very end they still found a couple of more scents they needed to check out ... but came when called.


It's a beautiful day here in 'the tropics' of Southern Indiana ... gotta go ... Stella is howling for lunch and now has Heidi barking along with her.

October 08, 2013

Oil Cooler Lines Tested - No Leaks

Came home from work with clear sunny skies and 70 degree temps, it was time to finish the job.

The first clip, top of radiator was a little hard to put on at first but after I used my angled mirror to see the bottom of the connector and then a pair of needle nose pliers to pull the clip around the connector, things went pretty quick. It took a total of 20 minutes for the 4 clips but most of that time was on the first clip and the upper connector at the oil filter block underneath the rig.

I wiped everything down so there was no oil from the past, turned the engine on and then looked at all the different connectors, with my small bright LED flashlight....not a drip of oil anywhere. I increased the engine idle speed for a minute or so, then little it idle for about 10 minutes while I went inside to clean up.

After rechecking all of the connectors for leaks, I took it out for a short 12 mile run on the highway at 55mph.

No leaks.

Total cost was around $100 counting the lines and the hook tools I bought. I'm pretty sure I saved myself around $150-$200 in labor if I had a mechanic do the work. I gained a lot of experience and learned more about the rig I bought.

I plan on changing the oil tomorrow just so I can start with clean oil and will know the date, mileage and type of oil without any guess work.

October 07, 2013

Day 3 - Oil Cooler Line Clips

I wasn't sure the clips I took off the connectors could be reused even if they were not stretched out. So I thought I'd buy new ones.  I ended up buying 3 of them at NAPA but they didn't have a 4th in the same size.

Before I stopped at NAPA I stopped by my local GM mechanic where I had bought the OEM oil cooler lines. I showed him the clips I had pulled out and asked him if I could use them again. Bill said I could as long as I didn't stretch them out when I pulled them out. Then he said something quite interesting that made me wonder what was going on.

Bill said the only way I could buy new clips was to buy the new connectors. I asked him before buying the oil cooler lines if I needed to buy new connectors or could I just buy the lines and he said only the lines were needed unless my leaks were at the connectors. Today after I started to leave, he said he would recommend I buy new connectors with the new lines. I asked him why didn't he tell me that when I bought the lines because he knew what I was replacing.  Makes me curious on why the change of information.

The NAPA owner said I would have no problem using old connectors with new lines. He explained the clips would work on the old connectors and the black plastic sleeve that slides over the clips not only protests the clip from dirt but is also functional in keeping the clip lined up as the sleeve snaps into the connector.

Hopefully tomorrow I'll get the clips installed after work.  Then I'll fire the engine up for a quick to check for any leaks.

Looking at the old clips compared to the new clips there was a difference in spacing, so they had possibly stretched a little but I could squeeze them back a little with pliers to their original position.

October 06, 2013

Day 2 - Oil Cooler Lines Installed

Only 4 new clips to go.

I told you before I wasn't a mechanic but I have been able in the past to do the basic repair for trucks, VW buses and cars. So I kept thinking last night, this job cannot be that hard to do. It's 2 lines and 4 connectors with a clamp clip that is extremely tight to get under to pull out. Add my confusion with what my mechanic Bill told me last week. I was under the impression talking to him, the clips stayed on and "his" tool just turned them enough releasing their pressure to pull the oil lines out.

That was a wrong impression.

So I took off to the local AutoZone to return the "oil cooler line" tools back for a refund and hopefully talk to someone different over there that may know something or anything about what I am trying to do. After all, I have shown everyone at NAPA and AutoZone the pictures I posted on this blog and had in my iPhone. NO ONE told me to pull the clips out....they kept selling me a set of "oil cooler line disconnect tools" that would spread those clips, release the pressure and slide the old lines out and the new lines in. Only the YouTube video talked of pulling the clips out. Now that I know what the clip's purpose was with this type of oil line, it's simple why you pull the clips out.

I left AutoZone with my 3rd set of "the right set of oil cooler line installation" tools, a Haynes Manual for Chevy Vans from 1998-2010, for my own sanity. Since my rig is on a Chevy Van Express 3500 frame.....and it included pictures I felt this manual might be worth the overpriced cost. I'm good with pictures....LOL. Still I wasn't sure the pictures I needed would be in the manual. I got home just in time for the Indianapolis Colts football game on TV so I had pretty well decided that I was done with auto repair for the day, just by making my purchase. During the first commercial I started looking the the Haynes Manual and I find a picture that could have been taken from my iPhone of the infamous clip that I couldn't get off. The describe the process of TAKING OFF THE CLIP!!

While the Colts fell behind 10-0 fast, I set the DirecTv DVR to record the game. I picked up my "hook" tool that I thought wouldn't work, only a different angle and got that 1st clip off that was on factory tight in a matter of a few minutes.


I was in shock!!!!  That clip had been my hold up on this job ALL weekend!!

I moved to the 2nd clip at the bottom of the radiator and that clip lifted up and out smooth has butter. Now the two metal hoses were not moving. About the time I was going back to football and say heck with it...I tried moving, twisting the top hose and little my little it started getting lose. I took a flat edge screw driver and by twisting that flat edge against the metal line....it popped out of the connector.  I'm on a roll so I forget about football, I'm going to finish this job today.


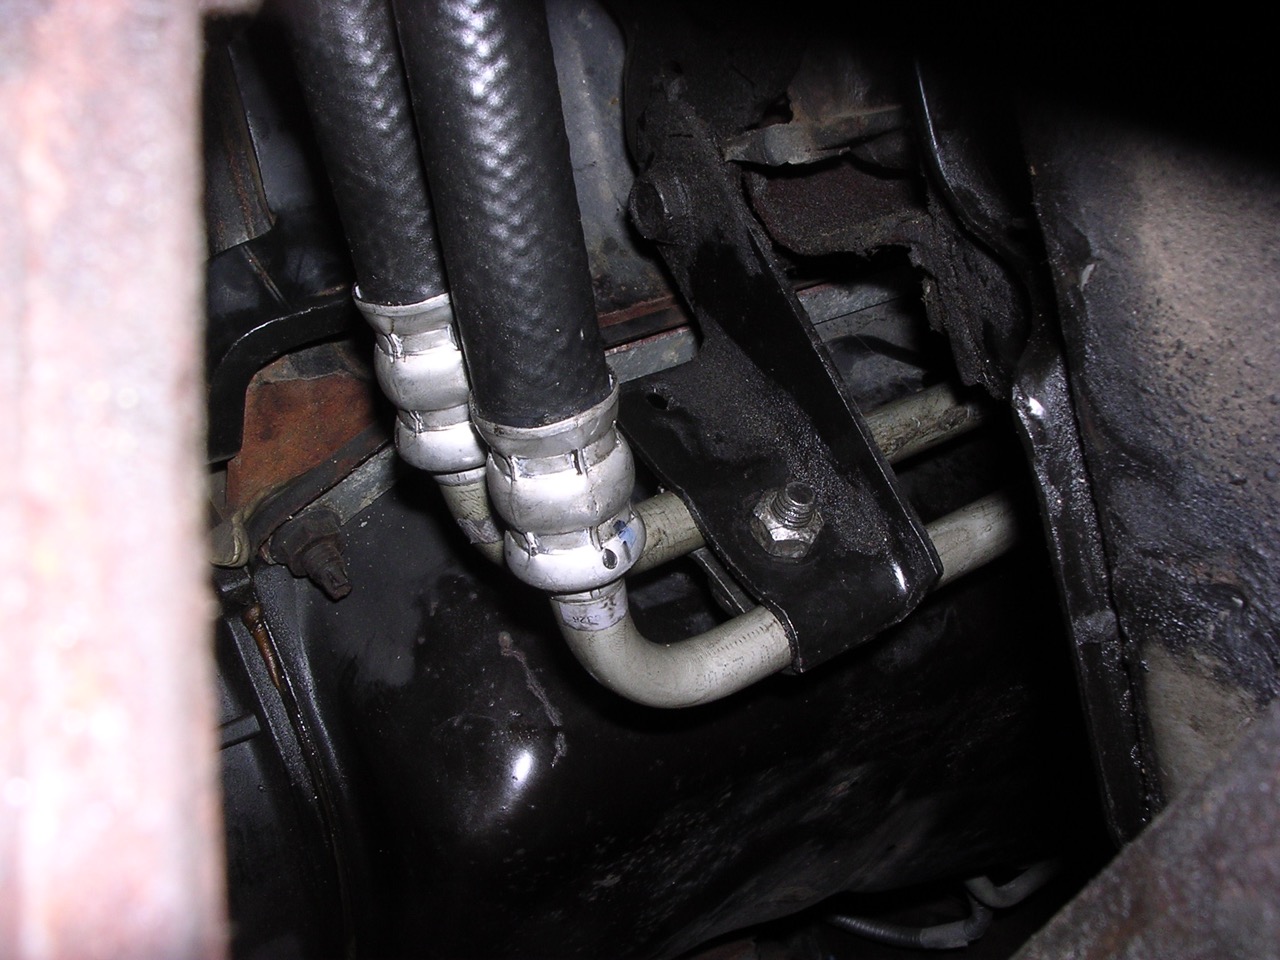
The lower metal tube on the radiator, came out with no problem. Now I had to get a one bolt bracket off that held both hoses in place before it went underneath. The problem was I couldn't fit my arm down there at an angle where I could get a socket wrench on it. In the picture below, that bolt is in the black spot in the center. I finally got that off, pulled the bracket up to along the hoses and took it off.


The big U bracket that the two lines run through is shown below.


I got underneath the rig to pull the lines toward me but even with the black rubber material I couldn't get them to flex and move around some of the RV frame....so I cut both rubber hoses and let the oil drip/run into my oil pan I use for oil changes. I am about half way of getting these lines out, when I run onto a different one bolt bracket that later was a lifesaver when I re-installed the new lines...this bracket not only supported the lines but lined them up correctly. It was pretty easy to get to even with little room under the rig.


Two clips to go up by the filter...I use the hook tool...1st clip out within seconds. The last one of four clips turned as I pulled one end out and I thought I had lost it on the ground (grass) under the RV but there was so little room to maneuver that I couldn't just turn to see where it may have landed. I couldn't find it. The 3rd line comes out smooth as butter. I get to the last line and it will not budge...will not twist..nothing...it's like it's frozen in that connector. I'm stuck on the final line!

I go in the house to get my LED small flashlight. As I look at the final line, I see that clip had not dropped into the grass but had swung around to the back of the connector. The clip was attached enough that it was still holding the line inside the connector.

So all the lines are out, my hands are covered in black oil residue, road dirt, underneath grease gunk and everything else that comes with working on a vehicle. I was able to keep all of my fingers, wasn't missing any tools nor the two bolts I would need to put the brackets back in. I didn't have any oil drip into my eye but my old ballcap took some major oil drips as I was under the rig working.

I did this work while keeping Winston (oldest basset) away and telling him to get out from under the rig...he was determined that I needed help under the rig, so he had crawled on his stomach to get a hounds eye view of the work underneath the RV. Luckily he lost interest and scooted out backwards and laid in the sun the rest of the afternoon.

I almost decided to stop there and install the new lines on Monday but I thought there's plenty of daylight left, it's sunny  .... so I thought I'd at least get the lines pulled through the frame underneath and attach those two brackets that lined up the lines but not tighten them until I had all four lines in their connectors.

The longest part of the installation was installing these two 1 bolt brackets. Some of the time I couldn't see what I was doing. I needed to squeeze this U shaped bracket at the bottom, slide the bolt in and then find the hole on the frame that the bolt was to attach to. It took me a while but finally got the bracket bottom squeezed together with my index finger and thumb while holding the bolt with my middle finger. Once I felt that bolt fall in the bracket...I slid it over about 1/4" by feel, couldn't see anything, I feel the bolt hit the hole in the frame. It's screwed in one click at a time on my socket wrench due to space available.

Bolt in the Center Right of the Hose

Underneath Tight Space
As I was underneath the RV to put the last bracket in, I couldn't remember how the lines went. I must have spent 30 minutes seeing those lines were not going to work on the bracket the way I had them. They would have been pressed tight against the frame and I knew that road vibration would rub those metal lines into leaking. So I knew I didn't have something lined up right.

I then realized I was trying to put the bracket on the wrong side. Once I moved the bracket to the correct side, the lines lined up perfectly. When I installed each line into the connectors I could hear them pop into place, so a solid seal even without the clips. That oil you see is from the old lines coming out....I didn't wipe it clean before the picture, so the new lines are NOT leaking at this point.


I'm not finished.  I have 4 used clips but didn't install them because I am not sure if they are to be reused. I would feel better installing brand new clips and I can get them on Monday. I am going to put in just enough oil to cover the amount that I lost in this repair so I can turn the engine over and check for leaks on the new lines using old oil.

IF....IF there are no leaks after running the engine...then I am changing the oil on Tuesday and will start with new oil. The label in the engine bay showing the mileage, date and type of oil doesn't match the seller's story even though it is a recent oil change...imagine that?....I'll put in new oil and start clean.

So I didn't hit my hour prediction after getting those clips off but I estimate it didn't take me longer than 2-1/2 - 3 hours for the work I did on Sunday. My yard work ballcap took heavy oil drip hits. Better the hat than my head. At least the cap will clean up.


I'm hoping for no leaks with the new hoses installed. If there are leaks, personal counseling will be the next step because I will probably go off the deep end if that happens.

I was sold this "oil cooler line disconnect tool" three different times, different sizes and they never worked as the process was described to me. I know I followed their instructions but I don't think these are for the type of connectors I have. This set of four are going back tomorrow for a $20 refund. The one pictured was the one that would work on my oil lines. Wrong answer.

Nothing More Than An Engineer's Dream

Day 1 - Oil Cooler Line Replacement +1

You may be wondering what the "+1" is about in the title...welllllll let's see if I can keep a smile on my face as I write about it. We had "severe" thunderstorms around 6pm last night. With the torrential downpour I thought that would be a good test for my roof vents that I had left open by mistake. All the vents were open, even the Fantastic fan vent.

Rain was going sideways and hard during the thunderstorm.

Once the rain decreased to just a light rain, Sadie the bloodhound wanted out and Winston the old basset wanted out as long as he could stay under the house overhang...so I thought it would be great time to see if I had any interior rain damage in the RV.

All the walls, ceiling, the over cab bed looked good and dry and I'm thinking it's pretty amazing that all these vents could be open and the vent covers kept the torrential downpour out .... I was impressed to say the least. Just to make sure I wasn't pressing my luck, I closed the vent above the bed to protect any accidents to the new TempurPedic mattress the RV came with.

As I was standing in front of the fridge about to plug in the LED lights, I felt a big drop of water hit my head.

That's never a good thing, especially when you are inside. I glanced up for the source of the big drop of water and I saw a little water residue in the cracks of my light lens. I pulled the lens off and luckily an ocean of water didn't hit my face, I thought that has to be a good sign. Drops have to be better than a waterfall.

So I collect the hounds and head for the house to get a couple of tools so I can take the light fixture out of the ceiling to check on the leak situation. About the time I hit the coach door to walk in the RV, the rain clouds opened up once again for another 30 minutes of downpour. Back inside to watch the next football game. (Yes, I am a college football addict)

While watching football I remember that light fixture is right in back of the A/C. I wondered if that might have something to do with it.

Now forward to the update of the oil cooler line replacement.

Not a lot of success to report on day one. Between the end of my IU game (upset Penn State) and the start of the 8pm game I had enough time to crawl through the local traffic that was in town for the annual Apple Fall Festival. And a crawl it was, but it is the only way I can get to AutoZone 15 miles away. I had called earlier and AutoZone told me they had the right tools to remove the clamp that I pictured in yesterday's post. So off I went to make the purchase.

The set of 4 "hook" tools, small screw drivers with a sharp "ice pic" at 4 different angles, that I had bought at NAPA Saturday morning didn't work. This clamp is on as designed....very very tight. I couldn't get the hook under the clamp to pull it loose.  Was my mechanic Bill showing me a tool that would REMOVE the clamp or just LOOSEN it enough to slide out the oil line? I was under the impression from him, it would turn the clamp enough to open up the space for the oil line to be slid out and the new one slide in. All the YouTube video's I have seen, show the clamp being removed and replaced but like I said yesterday ... I didn't have new clamps that came with my oil lines.

So it's early Sunday morning ... coffee is a lifesaver ... and it's cool and rainy outside, it has rained for the past 1.5 hours I have been up and through most of the night.

I'll be heading over this morning to AutoZone to return the tools they sold me. They might be too big but they are designed to fit over the line, push into the connector and since they are spring loaded, they are suppose to open up that tight clamp enough to slide the old line out and the new line in. Based on the tension of the spring loaded tool and the tightness of the clamp on the connector ... I believe their tool was nothing more than a designer's dream.

So the plan for today, return the tool, maybe talk to a different sales person and find the correct tool. My mechanic Bill is closed on weekends and probably only answers calls where his tow truck is required since he didn't return my phone message about borrowing the tool he showed me. One thing though, the connector he showed me last week is not the same type of connector I am working with.

I am thinking I may need a stronger "ice pic" than the one's I have. The search continues for the correct tool. I believe once I find the correct tool to get those clamps (4) off, then I will have these lines replaced within 2 hours tops.

October 05, 2013

Day 1 - Oil Cooler Line Replacement

RAIN DELAY - pouring! at 9:43am local time.

While drinking coffee this morning as the pregame warmup, I checked intellicast dot com for weather radar that is my preference for weather radar. All rain was south of me and west of me by 200 miles. So I started THE project with sun partially showing on an overcast morning.

Opened the hood, slide back the first line dust cover and there was the C clamp just like my YouTube instruction showed me. I could already tell that my idea of just loosening a nut was not even a close guess and it looked more and more like Bill's tool was what I needed. The removal tool that I bought at the local Napa were just for A/C and fuel hoses as I had pointed out to the cashier but he insisted those were the tools he used to remove the oil cooler hose.

The YouTube video showed using a needle nose hook tool that got under the C clamp and pulled it out enough that you could grip the clamp with the needle nose pliers and then pull the stretched clamp complete off the connector. His hoses came with new clamps, mind didn't. So, I attempted to pry my hook tool under the clamp but I am not sure that is the correct procedure for the clamps that I have. I believe now that Bill's tool is used like he described, with the tool releasing the pressure of the clamp just enough for the old line to slide out and the new line to slide in.

I am pretty sure of that because my lines did not come with a separate package of clamps as if the old ones were replacement. I think Bill would have ordered those clamps if I had needed them.

But the excitement of this morning is yet to come.

Leaving the hood up, my tools sitting outside next to the RV, sun poking through the cloud overcast and knowing no rain is within a 100 miles of me on radar ... I jump in the Chevy pickup and head to NAPA in town to return the incorrect tool and buy hopefully that hook tool I had seen on the video.

While walking back to the truck at NAPA to leave, it sure did look awfully dark in the sky and rain could be just any minute....that is the only thing I was right about this morning. Just as I closed the truck door, rain started pouring down so hard you could barely see.

My RV hood is up, tools sitting outside by the RV and it's pouring so hard I can't see?????  Fantastic.

I told you "Murphy" and I were close friends when I did house or auto repairs....or so it seems. LOL I drive my 1-2 miles back home knowing I will have everything soaked that is sitting outside. It's was strange but the closer I got to my house the highway had less rain on it and by the time I was almost to my driveway, the highway was completely dry!!  LOL

I pulled in, took everything inside that had been sitting outside next to the RV, then tried the new hook tool in prying up that clamp off of the radiator connector for the oil line hose as the video showed. That clamp is on their so tight that I cannot get the hook under the clamp to pop it up enough to take off the connector. So looking at that clamp pictured below, it looks like a tool will be needed that can squeeze that small clamp you see by the large nut, releasing enough pressure for the line to be pulled out and later, the new line slid in, with the clamp staying where it is.


While I was trying to fit my new hook tool under that pin, the rain arrived. I closed the hood and sprinted for the house.

In the meantime while writing this post and loading pictures it has rained in a steady downpour for the last 20 minutes. With the tornadoes in Nebraska and Iowa last night and the storm in the gulf heading north, it looks like it will be a weekend of rain here in southern Indiana.

Hopefully the "football gods" will prevent the DirecTv signal from being blocked due to bad weather.

October 04, 2013

Bought a 2004 but Find Out It's a 2003

Should I be concerned?

Would you be concerned, if what the RVT ad showed and what I was told by the seller before I made the purchase, was different than what is confirmed by the VIN number on the title today?

A few weeks ago I posted on an RV forum that I was looking at a 2004 Coachmen and was looking for any kind of feedback on a 5.7L engine and that RV traveling in the western states. I was then told by the seller it was a 6.0L engine, which would make a difference in buying replacement/repair parts, possibly performance. From that forum post from a couple of weeks ago, I confirmed today that I have a 2003 Coachmen with a 5.7L engine instead of a 2004 Coachmen with a 6.0L as advertised. The 8th digit from the left on the VIN shows R, which is a 5.7L. Not until 2004 did they change to the 6.0L based on information that came from two GM Tech's. The local GM mechanic told me about the 8th digit from the right of the VIN shows it was a 2002 chassis earlier this week.

So, should I be bothered that a small list of things the RVT ad showed as well as what the seller told me before the purchase is confirmed to be different that I have bought? Or, am I just on the paranoid side for buying a used RV?

As far as the oil cooling line replacement, I plan on starting Saturday morning early unless there is heavy rain and lightning. The forecast shows only a 40% chance of thunderstorms tomorrow and 50% chance of thunderstorms on Sunday.  I am anxious to see if the connectors are what I think they are instead of what I am told. That will mean no tool for my guess or using a connector tool on theirs.


October 02, 2013

Oil Leak Source Found

As scheduled on Monday, I crawled under the RV after I got home from work. It was a pretty simple and fast find. I wiped all the oil residue off the oil filter, oil pan, the hoses, and even absorbed the small spot up in the front of the oil pan where it meets the engine. Instead of waiting the 24 hours to see if I had any drips and then driving it on Tuesday, I turned the engine on after cleaning it up and within 2 minutes of idling the engine, my first drip showed up.


Those hard lines are coming from the oil filter, then the black hoses meander through and around the frame and just inside the wheel well, turning back to hard lines that go into the lower radiator...the oil cooling hoses. The 4 connectors between the black hose and hard lines are factory sealed.

So Monday night I took a quick trip to Napa Auto and then to AutoZone, both showing me an assembly for a Chevy 6.0L on a 3500 van frame...but the length's of the hard lines didn't look right, nor the angles. I came home that night and did some further internet searches without much luck.

Tuesday after work I headed for my local mechanic in this small town, "Bill's Auto Repair" that is right across the street from the small mini mart/gas station called "The Picnic Basket".....I am assuming you can read from those two business names and understand just how small the town I live in is. Which at times makes it hard to find repair or replacement parts for anything that has a problem. Even though the town is small and hard to find replacement parts at times, I felt that Bill would know where and how to get the correct oil cooler hose and/or assembly.

He told me he didn't have room above the lift in his garage to work on RVs and he was too old to crawl under an RV and have to work in his gravel parking lot to replace the hose, but he thought he ecould get the GM OEM part for me. I just had to give him the VIN of my RV and he had a site that would cross that VIN to the correct GM OEM part.

I picked up the correct hoses today and matching them with my pictures of the lengths and angles of the hard lines, they are identical.

You have understand something first before you think I am now home free on this repair job. I am not a mechanic, I'm an accountant. I do regular maintenance on my old Chevy pickup truck and use to on my old 60's VW buses I collected a few years ago but as far as doing major repairs ... not me. Also when I have attempted most auto maintenance "Murphy" shows up and makes a normal 1 hour job into an all day affair with me swearing at the end of the job that I will never buy another used car in my lifetime".

"Murphy" didn't take long to show up. Just as I picked up the hoses Bill told me "you know you will need a special tool to open those connections to your oil filter block and the radiator". No, I didn't know that, I thought from the picture I would just unscrew the nut and that would loosen the hose connections enough for me to pull the old lines out and install the new lines then tighten the nut.

I ended up going to the local Napa Auto and buying a plastic connector tool set that says it will work but it doesn't look nearly as impressive as the tool kit for different size connectors that Bill showed me in his shop. I'll try the one's I bought first. Bill said if those didn't work, I could take his set home with me to use as long as I could get them back to him the same day, because they use them every day.

How's that for service?

So as I sit here with the new oil cooler lines, I look at the weather forecast and see rain for most of Friday, Saturday and Sunday. I'll wait and see how it goes but I hope to replace the hoses on Saturday with a mindset, yes, it might take me all day just because the two connections to the oil filter are in a pretty tight place. I'm not sure if I can drive it 45 miles with this oil leak to the nearest RV shop to have them do the repair, if I can't get my tool around those two connectors to pull the old lines out and insert the new lines.

These are the two places I need those tools to fit. Sorry for the blurry pictures.


One thing before I go. This repair job does make one thing evident. If this would have happened while I was on the road out in the middle of nowhere I would have either needed to tow a toad or have Good Sam's Services where they would tow my RV to the nearest repair shop where just the repair costs would have been a lot more than the $103 I have spent so far on parts and the tool.

I am now thinking of towing a toad even though I would prefer not to.